
I use the Stewmac fret slotting miter box to cut fret slots in guitar fingerboards. This is an effective setup and more efficient than you might think. However, when I first received the miter box, a few test cuts indicated that it was slightly out of square. There was no obvious way to adjust it and the included instructions didn't acknowledge that this could be a problem in the first place. This post describes the process I worked out to fix it.
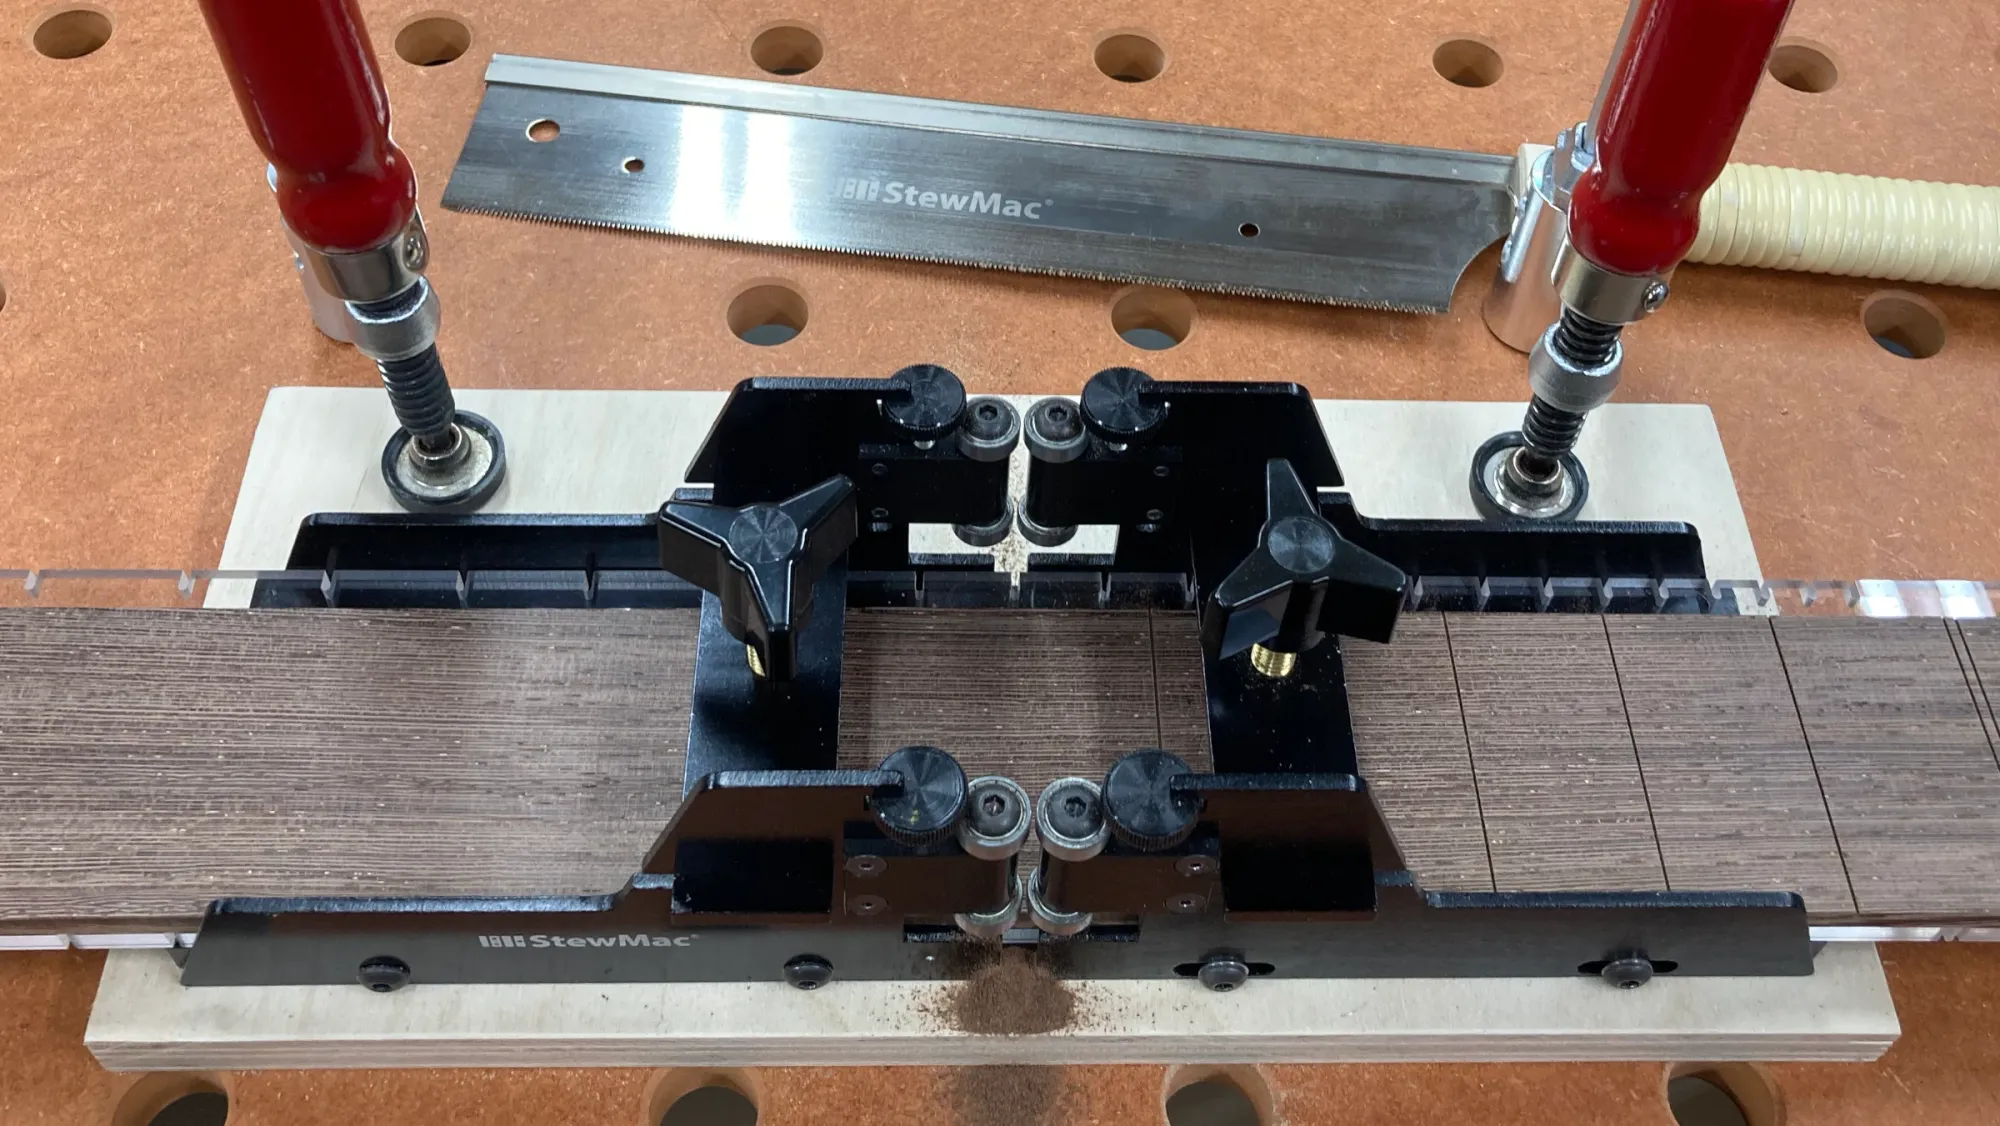
Lets get our bearings first. The box has two fixed fences (front and rear) and two adjustable fences. You can tell them apart because the adjustable fences have long slots for the mounting screws. One of the fixed fences has a small locator pin for a fret slotting guide on the inside. I will refer to this as the front fixed fence throughout these instructions.
- Make sure the guide bearings on all four fences are set to about the same position, somewhere around the middle of the adjustment range.
- Loosen the screws that attach both adjustable fences to the base. Don't remove the screws. You just need to be able to slide the fences from side to side.
- The screws that attach the front fixed fence to the base have a tiny bit of lateral play. The screws for the rear fixed fence don't, so I assume the play is designed into the fence as a hidden means of adjustment. Loosen but don't remove the screws for the front fixed fence.
- Register your saw's plate against the guide bearings on the front and rear fixed fences.
- Register the long edge of a 4" square on the front fixed fence and carefully slide the short edge up to the saw plate.
- Adjust the position of the front fixed fence's until the saw plate is square to the fence. (Make sure the plate remains registered on the guide bearings on both fixed fences.)
- Tighten the screws for the front fixed fence.
- Confirm that the saw plate is square to the front fixed and rear fixed fences. Loosen the screws and fine tune the position of the front fixed fence if necessary.
- With the saw plate registered on the guide bearings for the fixed fences, move the adjustable fences until their guide bearings snug up against the other side of the plate. The saw should glide smoothly through the bearings but should have no lateral play. You may need to loosen the mounting screws for the four guide bearing assemblies while you make this adjustment, since there is a bit of play in them that you can use to get all eight bearings to contact the saw plate. Keep your square handy and confirm that the saw plate is still square to the fence before you tighten everything up.
- Tighten the screws on the adjustable fences and the guide bearing assemblies.
- Confirm one last time that the saw plate is square to all fences.
- Test the miter box on a piece of scrap that has a consistently straight edge. Confirm that the saw glides smoothly without any lateral play and the resulting slots are square to the edge.
You should now be able to cut consistently square fret slots.
You shouldn't have to touch the fixed fences again. However, if you move the adjustable fences to accommodate a different saw plate, or adjust the position of the guide bearings to change the slot depth, you should always confirm that the saw plate remains square to the fences.
A few additional tips:
- The mounting screws for the guide bearing assemblies are most fragile parts of the miter box. Don't over-tighten them. They need to be tight enough that the guides won't slip, but remember that they only move vertically and won't (or shouldn't) be subject to much vertical force during normal operation.
- The miter box includes a pair of hold-down clamps that ensure that the fingerboard and fret slotting guide stay put while you saw. Don't crank down too much on these, either. They apply upward force on the adjustable fences and might give you enough mechanical advantage to throw the fences out of alignment. A little bit of pressure is all that's needed to keep the fingerboard and guide in place.
Thank you for reading!
If you found this post helpful, please consider supporting me by subscribing or sending a tip. It will help fund my work and writing.
- Click here to subscribe
- Click here to send a tip