
I sanded my first two electric guitar bodies with a block that consisted of a piece of 5/8” birch plywood glued to a half-thickness of 2×4 offcut. The plywood provided a reliably flat substrate for the sandpaper and the 2x4 gave me something to grip. This was a simple solution and it worked well. The problem was that it wasn’t very comfortable to use. I had to take frequent breaks to keep my hand from getting tired. There was also something about the technique of using it that seemed to encourage bad posture, making matters worse.
I thought that the tote and handle from a hand plane would be a good interface for a sanding block. A vendor at my local flea market had a derelict Stanley Handyman #3 plane that I was able to get for $12.50 CAD. Like many junk shop hand planes, it was very rusty and had a broken tote. A night in a tray of EvapoRust followed by some light scrubbing took care of the rust. The break on the tote was clean enough to glue up without worrying too much about the strength of the joint. I also sanded out the handle and tote, and gave them a few fresh coats of shellac. The goal was to make them comfortable, not beautiful.
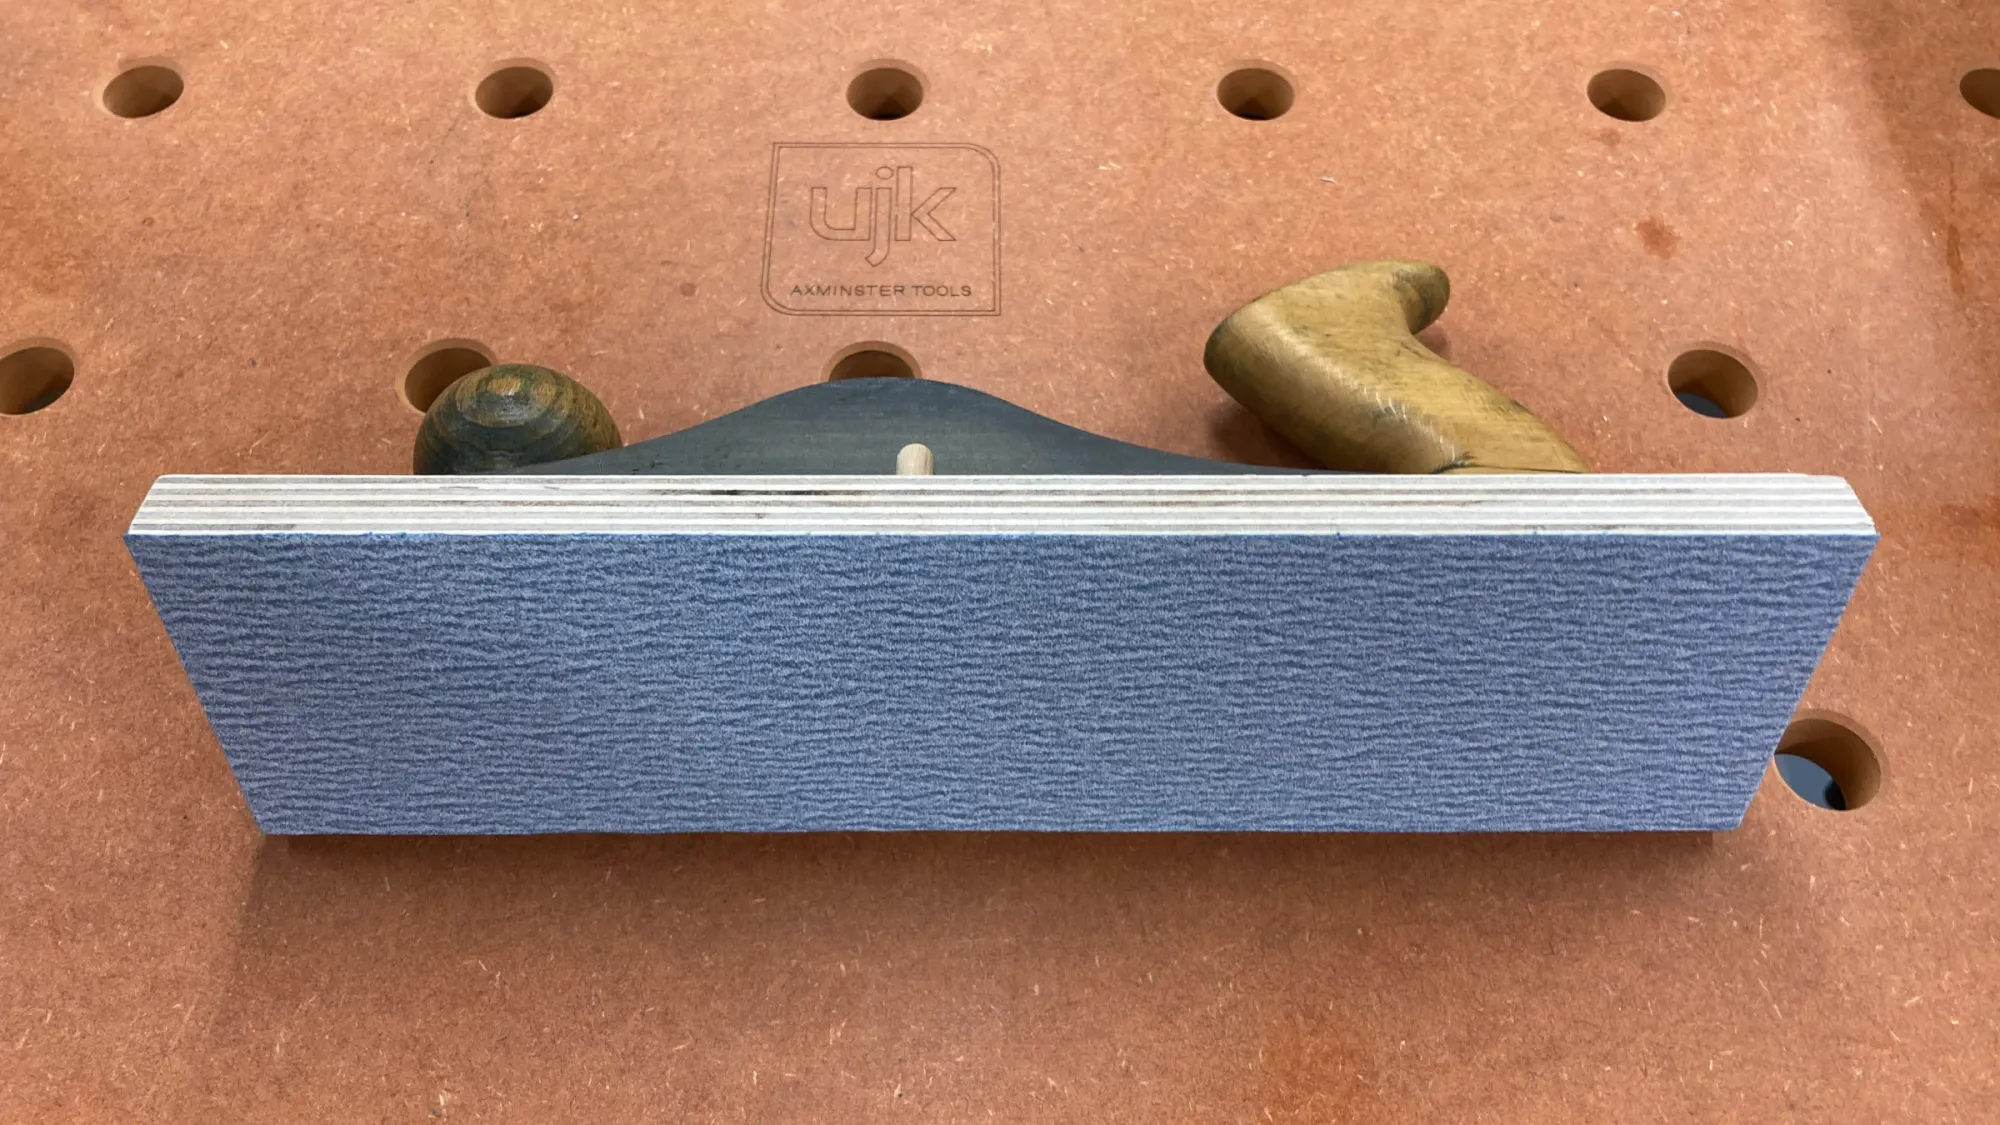
The new sanding block would be another strip of 5/8" birch plywood, cut to 12x3" to accommodate 1/3 of a 9x12" sheet of sandpaper in portrait orientation. This is a convenient size for the plane bed – if you design for a 1/3 sheet in landscape orientation, you'll need a 9x4" block. That's a bit shorter than the bed of a #3 plane. It might not matter in practice, but I was concerned that it would be easy to dent a workpiece with the overhanging bed if I wasn't careful. (You could also design for a smaller plane bed, but a #3 is what I had available, and is also the smallest plane you're likely to be able to get on the cheap.)
I could have mounted the handle and tote directly to the block, but the plane bed provides perfect mounting points already. Taking advantage of that would eliminate some extra work. The question was how to mount the plane bed to the block. I didn’t want to drill the bed for screws. The Handyman line may not have been Stanley’s best effort but drilling would still ruin a tool that could otherwise be restored and put to use. There was also the risk that the cast iron bed could crack while drilling.
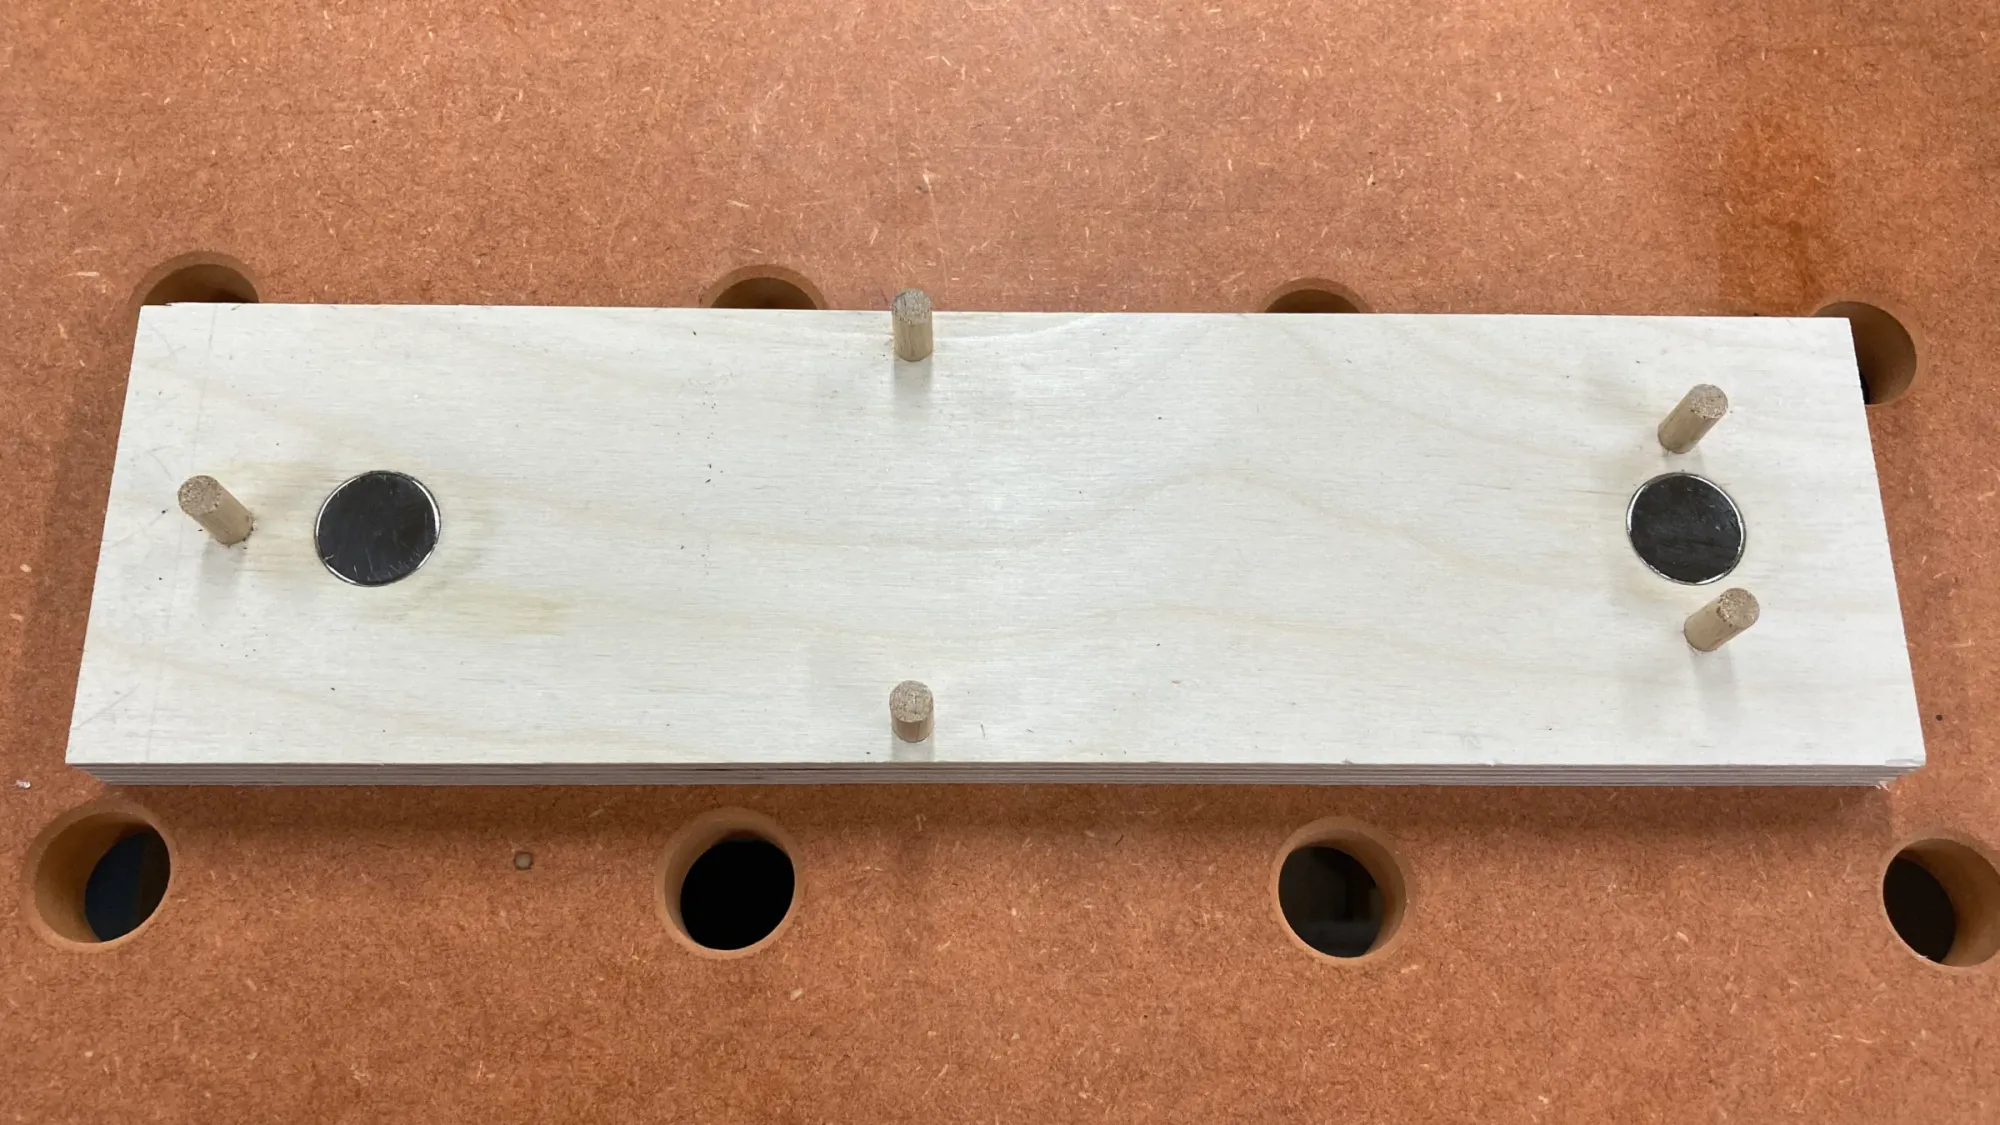
My solution was to flush-mount two 3/4” rare earth (neodymium) magnets in the plywood block. This only required two shallow holes to be drilled into the block with a 3/4" forstner bit, to a depth of about one tenth of an inch. (The thickness may vary, so set your drill press' depth gauge to the actual thickness of your magnets.) I positioned the magnets directly under the tote and handle mounting points where the bed is thicker. This provides ample power to hold the block to the bed when you pick it up. Rare earth magnets don’t resist shear forces very well, so I knew the friction from sanding would cause the bed to slide off the block. That was easily solved by mounting 1/4” dowel posts at the toe, heel and sides to keep the bed from moving.
The resulting tool feels comfortable and encourages better posture. It doesn't damage the plane, either. If you already have a #3 plane and don't want to go looking for another to dedicate to this purpose, you can attach the block when you need it. I like having a dedicated one for a few reasons:
- It's always ready to use
- My normal plane won't get packed with sanding dust
- I can remove the frog and iron to save weight
How to Make the Sanding Block
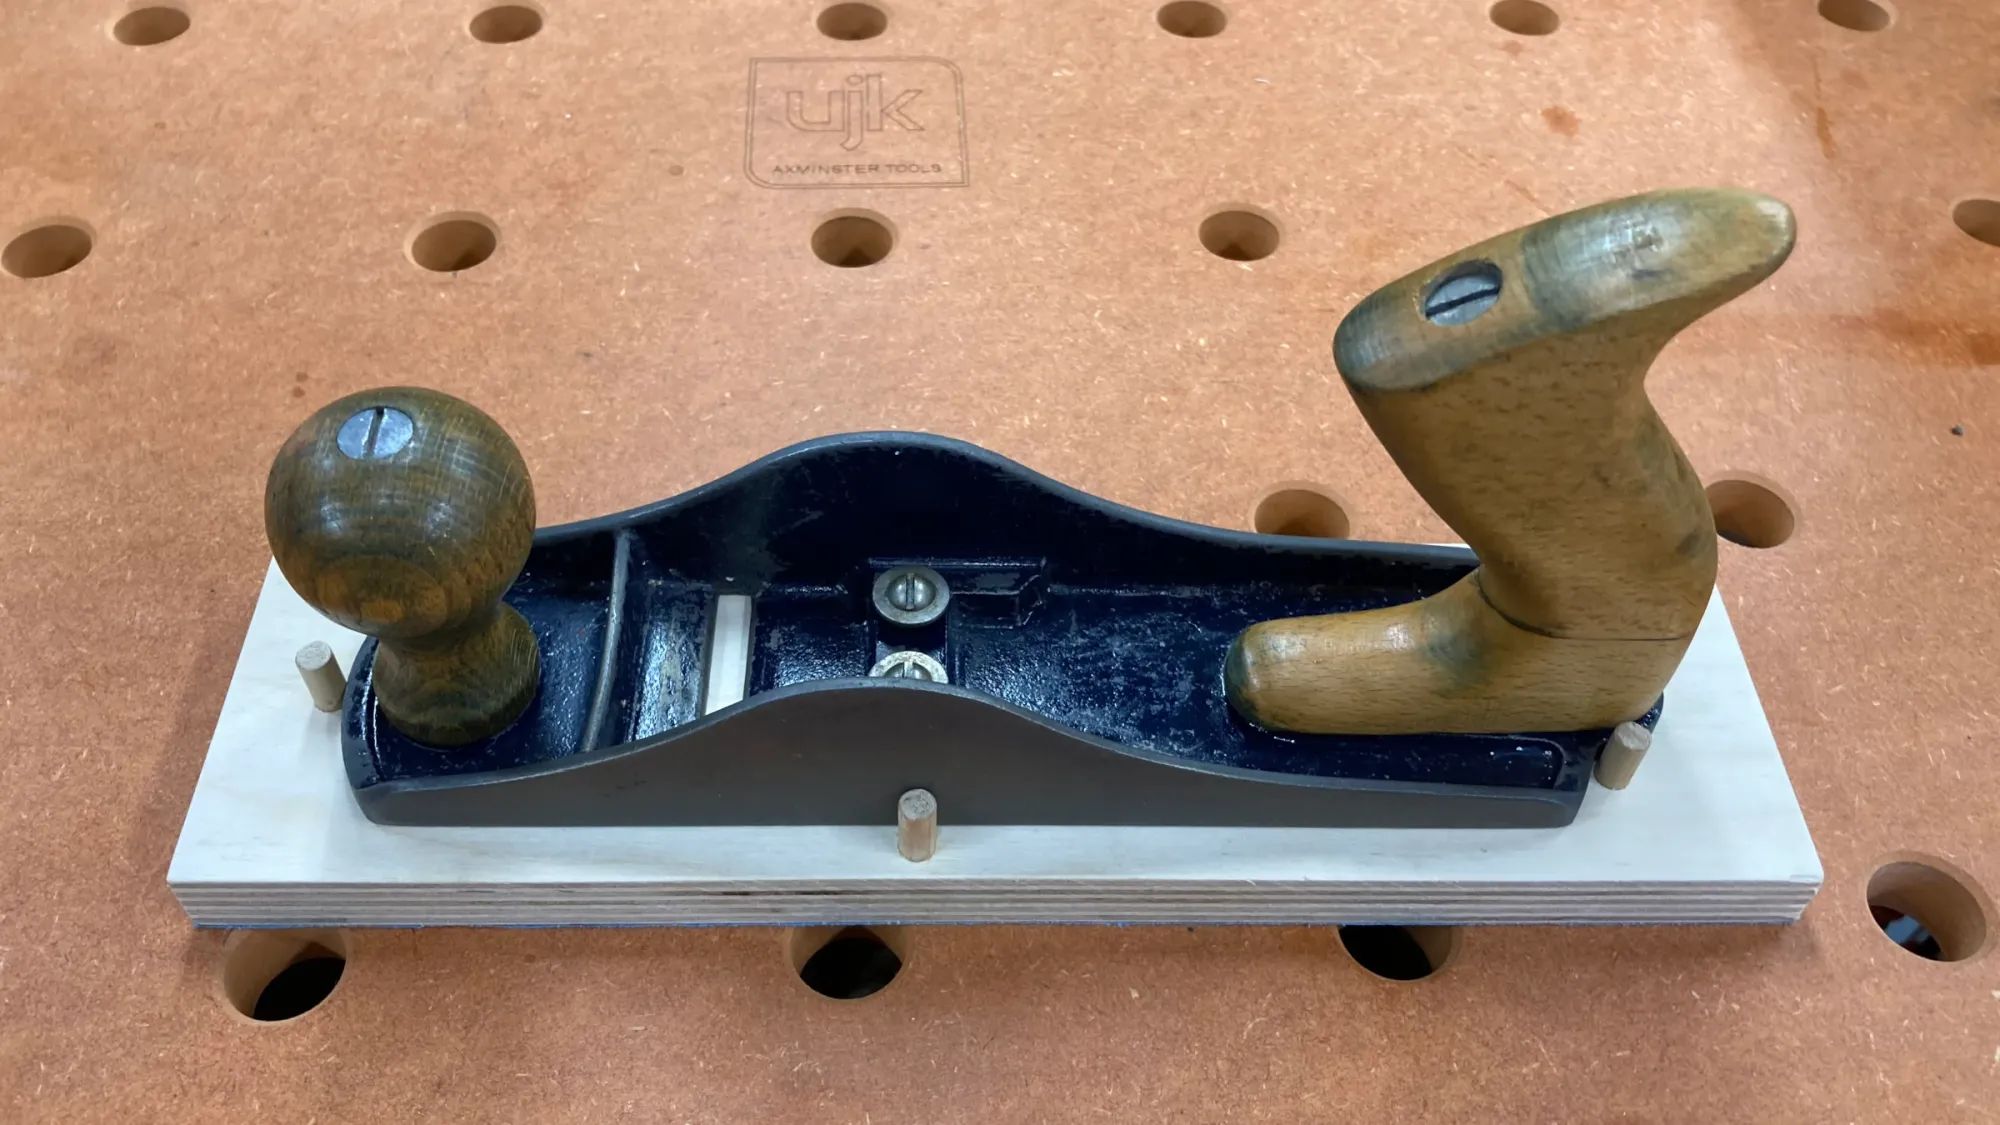
I didn't take process shots when I made the sanding block, so a photo of the finished product will have to suffice. From left to right:
- 1/4" dowel post to constrain the plane bed at the toe
- 3/4" rare earth magnet flush-mounted under the toe
- 1/4" dowel posts to constrain the plain bed at the sides
- 3/4" rare earth magnet flush-mounted under the heel
- 1/4" dowel posts to constrain the bed at the heel
Materials and Tools
- A #3 hand plane for the bed, handle and tote
- A piece of birch plywood or some other reliably flat and strong material, big enough to yield a 12x3" piece. (Thickness isn't that important. I used 5/8" plywood because I had an offcut that was almost the right size. 3/4" would be even better. 1/2" would probably be fine.)
- 1/4" diameter dowel rod (at least 6" in length)
- Two 3/4" rare earth (neodymium) magnets
- Wood glue
- Cyanoacrylate (CA) glue (super glue) and accelerator spray
- Contact adhesive spray (I like 3M Super 77)
- Sandpaper
- Table saw (or some other means of cutting an accurately sized block)
- Drill press
- 1/4" brad-point drill bit
- 5/16" drill bit or transfer punch (optional)
- 3/4" forstner bit
- Mallet
- Small square
Assembly
- Remove the frog and iron from the plane, but leave the handle and tote installed. This is optional but will make the tool lighter and easier to handle.
- Cut a 12x3" piece of birch plywood at the table saw. This will be the sanding block. Use sandpaper to break the sharp edges and corners.
- Center the plane bed on the plywood block. Use a drill bit or transfer punch to mark the centers of the holes for the dowel posts. I used a 5/16" transfer punch to ensure a slight gap between the 1/4" dowels and the bed. This makes it easier to attach and detach the block. Mark one hole at the center of the toe, two at the heel on either side of the tote, and one on each side about halfway along the bed.
- Drill the dowel holes using a 1/4" brad-point bit, preferably on a drill press. These holes only need to be about 1/4" deep.
- Place the bed back on the block and make sure the holes are all in the correct locations, and the dowels won't interfere with the bed. It's easier to fix problems at this stage.
- Cut a 1" length of dowel for each hole.
- Glue the dowels into the holes using wood glue. Use a mallet to make sure the dowels are seated and a small square to make sure they stand straight in their holes. You don't have to clamp the dowels down, but leave the glue to set for the manufacturers recommended clamping time (usually around 30 minutes.)
- Using a block of 1/2" thick material (e.g. plywood) as a guide, flush cut the dowels to a consistent length. (The actual length doesn't matter, so don't worry if your guide is slightly thicker or thinner than 1/2".)
- Decide where you want to position the rare earth magnets. The plane bed will be thicker under the handle and tote mounting points, so the magnets will exert more force in those locations. Mark the centers for the magnet holes on the block.
- Chuck a 3/4" forstner bit into your drill press and set the depth gauge according to the thickness of your magnets.
- Drill the holes for the magnets. It's better to start shallow and sneak up on the correct depth. The magnets should sit flush with the surface of the block. If they're proud of the surface, the plane bed won't be stable. If they're below the surface, the magnets' strength will be reduced.
- Glue the magnets into the holes with CA glue. Use regular CA glue, but if you also have thin CA, you can flow some around the edge of the hole after the magnet is seated. Give the magnets a shot of the CA accelerator spray to cure the glue.
- Attach the block to the plane bed. It should hold securely but be fairly easy to remove.
Usage
- Remove the block from the plane bed.
- Use the block as a template to cut a matching piece of sandpaper.
- Lay the sandpaper upside down on a piece of paper or plastic to protect your bench.
- Spray the back of the sandpaper with contact adhesive. If you're using 3M Super 77, leave it for about 20 seconds until it starts to turn white. (You could also use PSA-backed sandpaper rolls if you prefer to exchange money for time.)
- Align the sandpaper carefully with the block and press it on.
- Sand! Using an emery block to clean the sandpaper frequently will extend its life.
- When you need to replace the sandpaper or change grits, peel the old piece off and glue a new piece on.
Thank you for reading!
If you found this post helpful, please consider supporting me by subscribing or sending a tip. It will help fund my work and writing.
- Click here to subscribe
- Click here to send a tip