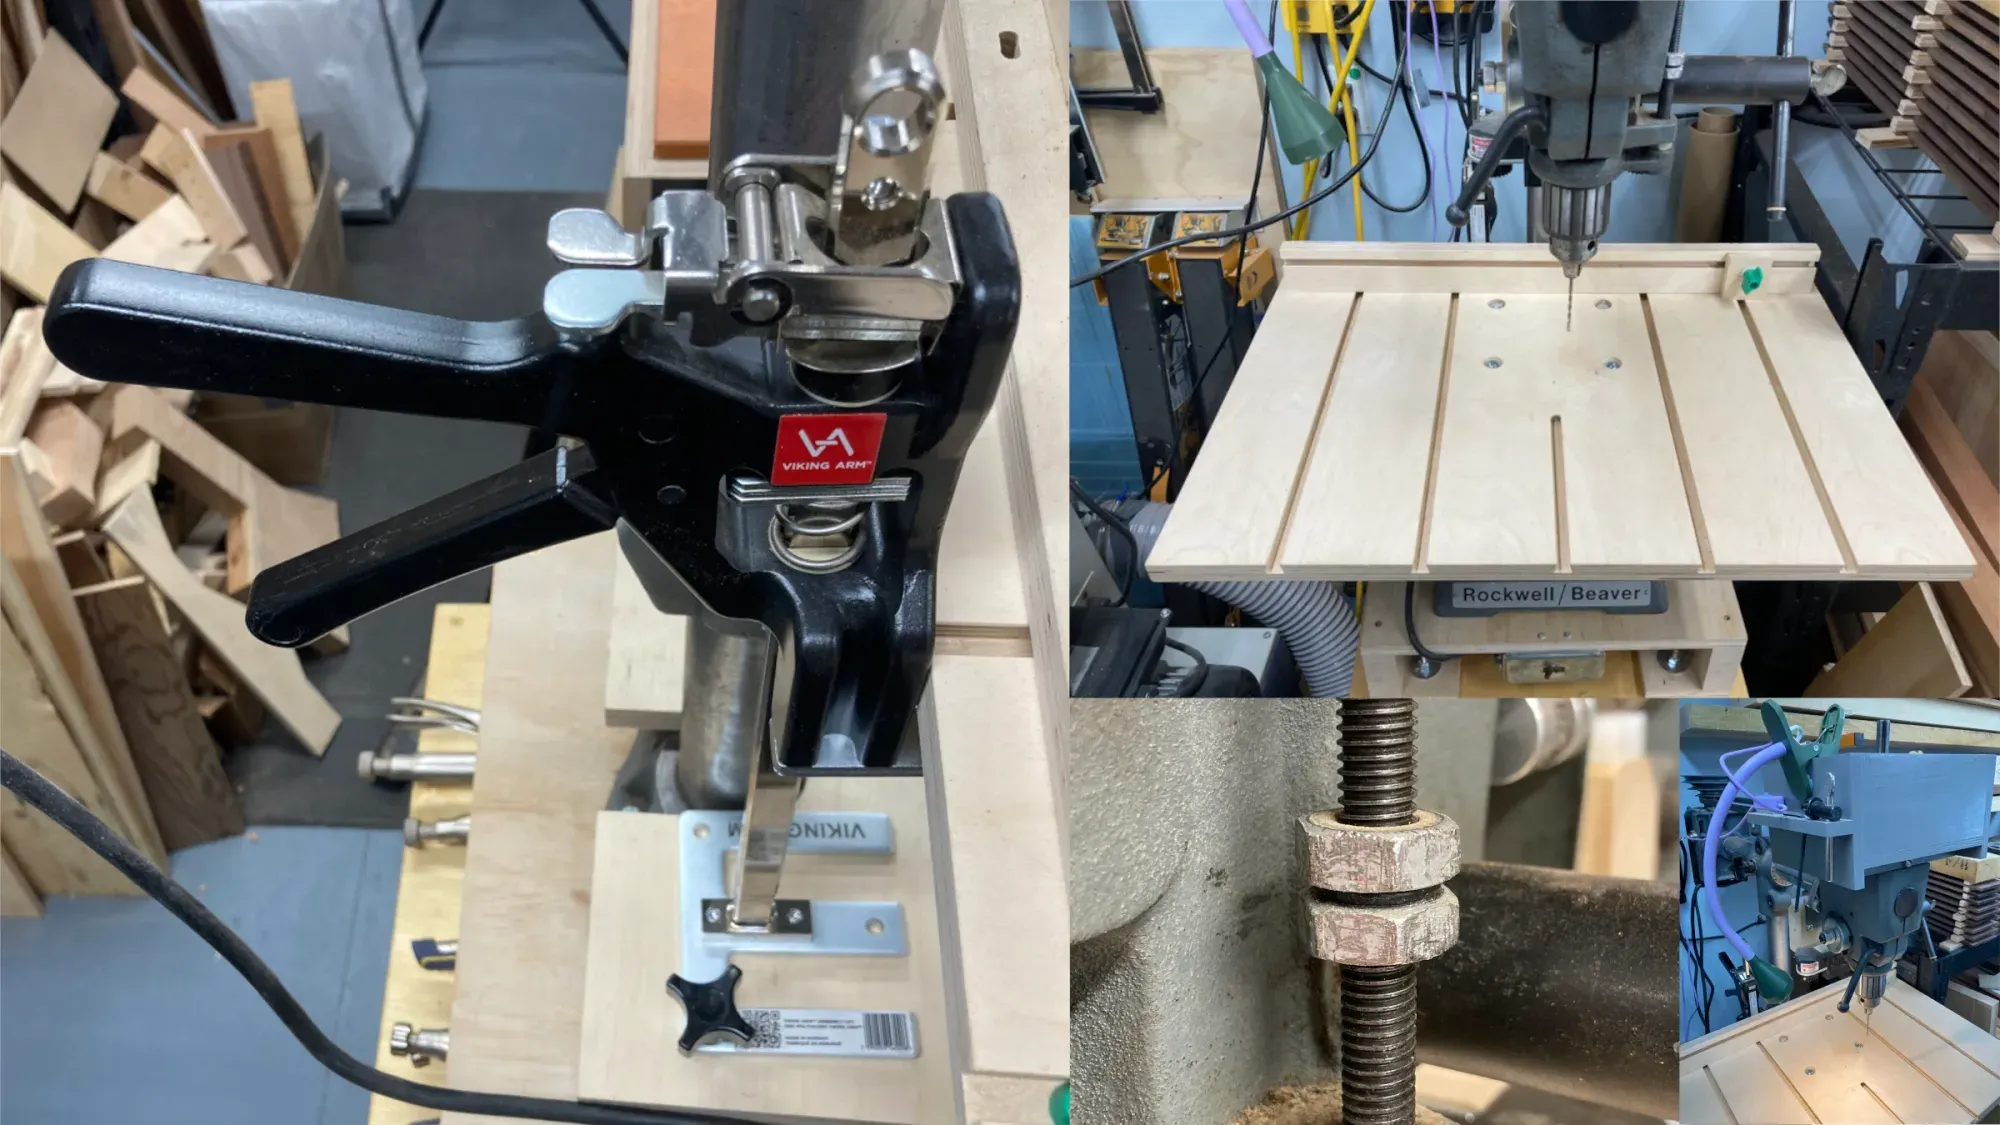
My old Rockwell/Beaver radial drill press is one of the most important tools in my shop. I specifically chose an older model for mechanical simplicity and build quality, but that also means my drill press lacks some modern conveniences. These are the little upgrades I've made to improve my quality of life.
Table of Contents
- Better Height Adjustment
- An Auxiliary Table
- A Less Annoying Depth Stop
- A Light
- The Upgrade That Wasn't Worth It
Better Height Adjustment
The most painful (literally) missing feature on my drill press was a way to adjust the table height without throwing my back out. Modern drill presses usually have a rack and pinion mechanism for height adjustment, but it's often kind of flimsy and you just know that fixing it will be a nightmare. I'd rather avoid that situation altogether, but that doesn't change the fact that the steel table is heavy and manually lifting or lowering it to a precise position is difficult.
I have a set of Viking Arm installation jacks that I only need occasionally, and never at the same time as my drill press. They provide a perfect solution to this problem. A full pull of the hand lever will raise the table as much as a quarter of an inch, but shorter pulls will move it as little as a millimetre. (Yes, I'm mixing measurement systems. I'm Canadian and that's how we work.) The incremental release trigger lowers the table about a millimetre at a time. You can also use the full release trigger to drop the table faster, but make sure you have a firm hand on the table when you do.
This setup offers a nice balance between speed and precision. I've been using it for over a year with no complaints.

What you'll need:
- One Viking Arm or a similar cabinet installation jack. You'll need one that has a mounting hole in its base plate. A quick survey of cheaper alternatives tells me that many of them lack this feature.
- A small piece of 3/4" plywood. You only need enough to cover your drill press' base so this is a good way to make use of scrap from another project.
- A 1/4-20 threaded insert
- A 1/4-20 machine screw no longer than 3/4". A machine screw with a star knob will make it easier to install and remove the Viking Arm. It's nice to have but isn't that important.
- Bolts, nuts and washers to mount the plywood to your drill press' base. Every drill press is different so buy whatever size and quantity you need.
- An appropriate bit to drill the hole for the 1/4-20 threaded insert. This is usually 13/32" or 7/16" (10mm or 10.5mm) but test in a piece of scrap first.
Installation steps:
- Cut a piece of plywood a few inches longer and wider than your drill press' base. This will serve as a mount for the Viking Arm.
- Measure and cut a notch in one end of the piece of plywood to clear your drill press' column. The cleanest way to do this is to use a hole saw to cut a hole somewhat larger than the diameter of the column, aligned to the center of the column. For example, if the column has a diameter of 2 inches and is centered 4 inches from the rear of the base, you would use a 2-1/2 inch or larger hole saw and center the hole 5 or 6 inches in from the rear edge of the plywood. The extra inch or two allows some overhang to help support the Viking Arm. (You can figure out roughly how much overhang you'll need by positioning the Viking Arm as described in step 5 and measuring how much of it hangs off the rear of the base, before you cut the notch. When in doubt, you won't regret leaving a little extra.) Next, use a table saw, bandsaw or jigsaw to cut two slots from the rear edge of the plywood to either side of the hole, creating a U-shaped notch. If you don't have a hole saw, you can cut the whole notch with a jigsaw or a bandsaw with a narrow blade.
- Clamp the plywood to the top of the base with the column centered in the notch.
- Figure out where you'll need to drill holes in the plywood to mount it to the base. Mark the positions of those holes.
- Position the Viking Arm on the plywood so the lift bars hook under the table. If you have installed an auxiliary table, make sure the bars make contact with the main table to get the most leverage possible.
- Mark the center of the mounting hole in the Viking Arm's base plate on the plywood.
- Remove the Viking Arm and plywood from the base.
- Drill the mounting holes you marked in step 4 and confirm that they line up correctly with the holes or slots in the base.
- Drill a hole in the plywood for the 1/4-20 threaded insert at the mark you made in step 6, and install the threaded insert.
- Reposition the plywood on the base and bolt it in place.
- Use the 1/4-20 machine screw to fasten the Viking Arm to the plywood.
- Make sure the Viking Arm is in the correct position and the lift bars make contact with the table.
- Unlock the table.
- Use the Viking Arm to adjust the table height.
- Lock the table to relieve the Viking Arm from stress.
An Auxiliary Table
The tables on most drill presses are typically small, and it can be difficult to place clamps and hold-downs where you need them. This is easy to solve by mounting an auxiliary plywood table to the main table.

My table is approximately 21" wide and 16" deep, and is routed with dovetail channels for Microjig Matchfit clamps. The fence also leverages the dovetail clamping system. Whether you use this system or traditional T-track, be careful about where you place the channels. You don't want your clamps to interfere with the drill press lever. I also suggest including at least one channel that runs the width of the table. I didn't, but there have been several times when it would have been useful and I plan to add one or two.
A Less Annoying Depth Stop
My drill press uses a jam nut as a depth stop, which is very trustworthy but also very annoying to unlock, move and re-lock. This tip from Fine Woodworking goes a long way towards fixing that. The author used a short piece of vinyl tubing as a sort of lock washer between the nuts to allow the depth stop to be operated without tools. I found that a rubber o-ring from the plumbing aisle worked, too.

A Light
I have a lot of ambient light in my shop but it's always helpful to be able to point it exactly where you need it. An inexpensive Ikea gooseneck light with a clip-on mount does the job for me. (As a bonus, the purple and green colour scheme was on clearance, and I feel that it adds a weird sort of charm.)

The Upgrade That Wasn't Worth It
If you look closely in a few of the photos above, you'll see that I also installed a laser guide on my drill press. This took some figuring out because the guide was designed to clamp to the column with the assumption that the distance between the column and quill is fixed. That isn't true of a radial drill press, so I had to make a special mount to clamp the guide to the head. It was an interesting problem to solve at the time and my solution worked fairly well. The problem is that I don't really trust it. I can never be certain that I haven't knocked the mount slightly out of alignment and the only way to know for sure is to test it, which costs time. A fence or clamp placed exactly where I need it may block the laser, rendering it useless. Even when everything is set up perfectly, a reflection of the laser off of a pencil line can create a blurring effect that undermines its precision. The laser sight seemed like a good idea at the time, but the real solution was to work on my technique.
Thank you for reading!
If you found this post helpful, please consider supporting me by subscribing or sending a tip. It will help fund my work and writing.
- Click here to subscribe
- Click here to send a tip